
From the Field: Gas recovery from a rack system in a grocery store

We recently had to replace a stuck valve in a non-segregated system for one of our grocery clients. This system incorporated various cooler and display case types and a large volume of refrigerant. The job was time sensitive so we had to use some tricks of the trade to ensure the process could be completed without affecting the operations of our client. Most importantly we needed to keep their product cool and usable throughout the procedure.
What was needed
We were faced with a stuck valve which needed to be replaced— specifically it was in a location which required cutting and reconfiguring of piping — There was no choice but to expose the entire system to the atmosphere. If you can't isolate the work area, a full-system recovery is required. Even if isolation is possible, you're still dealing with high volumes of refrigerant under pressure. Efficiency and safety are critical.
Step-by-Step Refrigerant Recovery Process
Preparation and Safety First
- PPE Required: Safety glasses, cut-resistant gloves, hearing protection (during venting or vacuum), and chemical-resistant clothing.
- Lockout/Tagout (LOTO): Ensure the rack system and affected circuits are locked out from electrical service.
- Check MSDS: Know your refrigerant properties (toxicity, flammability, etc.)—especially when working with blends like R-448A or R-404A.
- Ventilation: Ensure mechanical ventilation is operational. Rack rooms often build up leaked vapor.
System Analysis & Isolation
Segregated System:
- Use existing service valves to isolate the case or valve needing replacement.
- Close liquid line solenoids and suction ball valves to trap refrigerant in operating sections.
- Proceed with partial recovery from only the affected segment.
Non-Segregated System:
- You’ll need to recover the full charge from the suction, liquid, and discharge lines.
- Tag all circuits and document the connection layout.
Testing Before Recovery
- Verify Valve Failure using temperature probes, pressure differential, or leak detector.
- Ensure Gauges Read Stable Pressures—this confirms the system is at rest before tapping into the lines.
- Weigh Recovery Cylinders: Record empty weights before starting to track total charge removed.
Refrigerant Recovery: Liquid & Vapor Phases
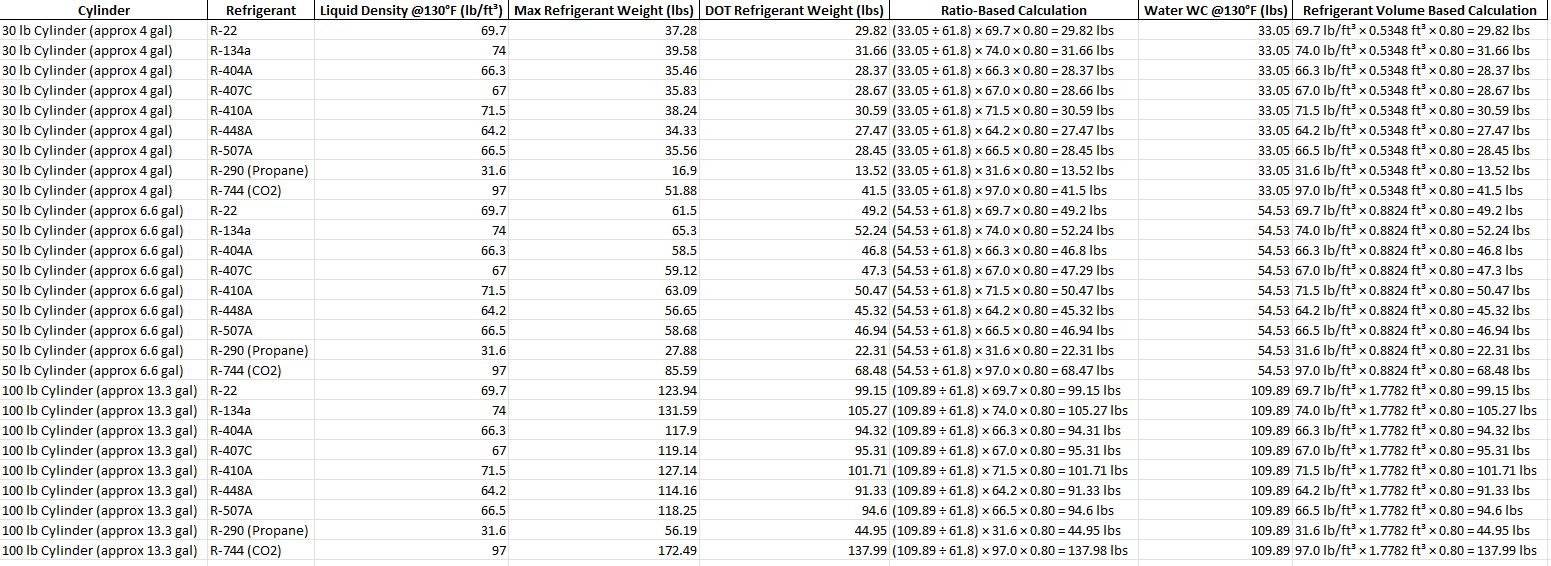
Remember not to overfill your cylinders! The EPA and DOT have specific guidelines for how these must be filled for transport and storage.

Refrigerant Weight=(Water Density / Water WC) × Refrigerant Density × 0.80
Liquid Recovery – Fast & Efficient
- Begin recovery from the liquid line using the push-pull method:
* Connect one hose from liquid line to cylinder bottom port.
* Use a second hose to create a loop back to the recovery machine and then to the top port of the cylinder.
- Only use push-pull if >10 lbs of refrigerant is being recovered and if the system allows free-flowing liquid movement.
Vapor Recovery – The Final Stretch
- Once liquid stops flowing, switch to direct vapor recovery from the suction header.
- Use short, large-diameter hoses to reduce pressure drop and increase flow rate.
- Keep recovery machine filters clean to prevent flow restriction.
Time-Saving Procedures & Pro Tips
Chilling Recovery Cylinders
Why it works: Colder recovery tanks create lower pressure inside the cylinder, encouraging refrigerant to flow in faster due to pressure differential.
How to Chill Cylinders:
- Pre-chill overnight in a walk-in freezer to ~35°F.
- Place chilled cylinders in an ice bath during the recovery process (don’t submerge valves).
- Keep them shaded or wrapped in thermal insulation to prevent rapid temperature gain during filling.
- Use an external cooler in a bucket of ice to chill the refrigerant as it goes to the recovery tank
- If available use a recovery unit with built in sub cooler
Time-Saving Calculation
- At ambient temperatures (80–85°F), vapor recovery of 100 lbs R-404A may take:
* Unchilled tank: ~55–70 minutes.
* Chilled tank (~35°F): ~25–35 minutes.
- Time savings: ~50%
Use Multiple Recovery Machines or Cylinders
- Rotate between tanks if pressure gets too high in a single one.
- Tandem recovery machines can cut vapor phase time nearly in half.
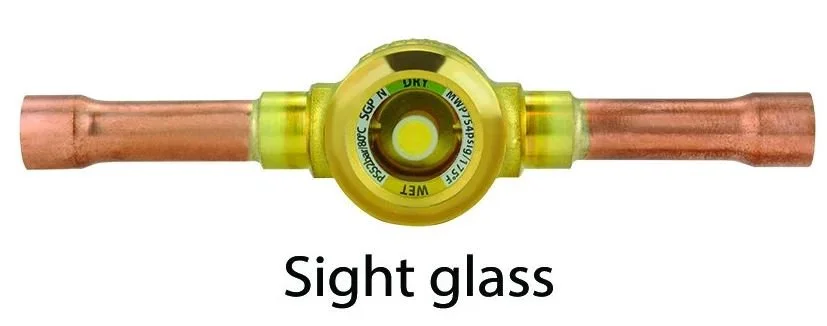
Monitor Flow with a Sight Glass
- Install a clear sight glass in the liquid line to visually confirm flow cessation.
Vacuum and Evacuation – Final Prep Before Recharge
- Use a vacuum-rated micron gauge – don’t rely on manifold gauges.
- Evacuate to <500 microns, ideally hold below 300 microns for 10 minutes.
- Triple evacuation method:
* Pull to 1,500 microns → break vacuum with dry nitrogen → repeat.
- Use short, large diameter vacuum hoses connected directly to the pump core, not through manifolds.
Replacing the Valve – Cut & Reconfigure
In Segregated Systems:
- Open isolation points only for the affected segment.
- Cut piping with a tubing cutter, not a sawzall (to prevent filings in lines).
- Install valve using Sil-Fos 15 or Stay-Silv 15 for high pressure systems.
In Non-Segregated Systems:
- After recovery, cut and replace the valve inline.
- Clean all piping with nylon brushes and de-burring tools before brazing.
- Pressure test with dry nitrogen to 150–300 PSI and leak check with bubbles or electronic sniffer.
Recharge Process
- Begin with liquid refrigerant to the liquid line to establish base pressure.
- Once the system reaches evaporator temperatures, transition to vapor topping via suction line.
- Monitor superheat and subcooling as you approach full charge.
Final Safety Checks
- Check system operation for:
* Compressor amps
* Case temperatures
* Oil levels and flows
- Log all recovery weights and refrigerant types for EPA tracking.
Final Thoughts
Recovering refrigerant from a rack system in a grocery store is a task that demands both precision and speed. Whether you're isolating a section or evacuating the entire system, your ability to manage liquid and vapor recovery efficiently, chill cylinders, and test your work rigorously can make the difference between a smooth job and a costly delay.
By applying these best practices, you not only meet compliance—but keep your client’s product cold, fresh, and unspoiled.
Don’t forget to read our other blog posts by visiting our website. www.jade.co